

NestJS 개발 환경 세팅
새로운 프로젝트 만들기
$ npm i -g @nestjs/cli
$ nest new project-name

위와 같이 package.json을 비롯하여 여러 파일이 생성된다.

src 하위에는 여러 파일로 나뉘어져 있고 app.controller.ts의 경우 app.controller.ts를 테스트하는 파일이다.
- controller: express에서의 router와 유사한 개념 - 라우팅
- service: express에서의 service와 유사한 개념 - 비즈니스 로직
// app.controller.ts
import { Controller, Get } from '@nestjs/common';
import { AppService } from './app.service';

@Controller()
export class AppController {
  constructor(private readonly appService: AppService) {}

  @Get()
  getHello(): string {
    return this.appService.getHello();
  }
}// app.service.ts
import { Injectable } from '@nestjs/common';
@Injectable()
export class AppService {
getHello(): string {
return 'Hello World!';
}
}// app.module.ts
import { Module } from '@nestjs/common';
import { AppController } from './app.controller';
import { AppService } from './app.service';
@Module({
imports: [],
controllers: [AppController],
providers: [AppService],
})
export class AppModule {}// main.ts
import { NestFactory } from '@nestjs/core';
import { AppModule } from './app.module';
async function bootstrap() {
const app = await NestFactory.create(AppModule);
await app.listen(3000);
}
bootstrap();@Get : 데코레이터로 함수나 메서드에 기능을 첨가하는 역할 → 재사용성 극대화
@Get() === @Get(’/’)
기본 동작 프로세스
main에서 bootstrap 함수에 의해 app이 실행됨 → app을 AppModule로 만들어줌 →
AppModule에 cotroller가 존재 → controller 내의 @Get 데코레이터에 의해 getHello() 메서드 실행 →
controller 내의 appService의 getHello 메서드 실행 → getHello 메서드에서 리턴값 반환 →
controller가 return값을 받은 후 module로 들어감 → 모듈이 NestFactory에 들어가게 됨 →
client가 알아서 해당하는 router에 들어가 값을 받게 됨
NestJS 구조 & Controller 패턴
Routing
import { Controller, Get } from '@nestjs/common';
import { AppService } from './app.service';
// localhost:3000/cats
@Controller('cats')
export class AppController {
constructor(private readonly appService: AppService) {}
// localhost:3000/cats/hello
@Get('hello')
getHello(): string {
return this.appService.getHello();
}
}
Request object (요청 객체)
@Get('hello/:id')
getHello(@Req() req: Request, @Body() Body, @Param() param): string {
console.log(req);
console.log(param);
return this.appService.getHello();
}
express의 const body = req.body 또는 const param = req.params 를 위와 같이 인자로 접근할 수 있다. 당연히 동적 라우팅 또한 가능하다.

그 외의 정보들 또한 인자로 접근하는 것이 가능하다.
DTO (Data Transfer Object)
- 계층 간 데이터 교환을 하기 위해 사용하는 객체로, 로직을 가지지 않는 순수한 데이터 객체(getter & setter 만 가진 클래스)이다.
- DTO는 어떠한 비즈니스 로직을 가져서는 안되며, 저장, 검색, 직렬화, 역직렬화 로직만을 가져야 한다
- 도메인 대신 DTO를 사용함으로써, 도메인 모델을 캡슐화하여 보호할 수 있다.
// create-cat.dto.ts
export class CreateCatDto {
name: string;
age: number;
breed: string;
}// cats.controller.ts
@Post()
async create(@Body() createCatDto: CreateCatDto) {
return 'This action adds a new cat';
}// cats.controller.ts
import { Controller, Get, Query, Post, Body, Put, Param, Delete } from '@nestjs/common';
import { CreateCatDto, UpdateCatDto, ListAllEntities } from './dto';
@Controller('cats')
export class CatsController {
@Post()
create(@Body() createCatDto: CreateCatDto) {
return 'This action adds a new cat';
}
@Get()
findAll(@Query() query: ListAllEntities) {
return `This action returns all cats (limit: ${query.limit} items)`;
}
@Get(':id')
findOne(@Param('id') id: string) {
return `This action returns a #${id} cat`;
}
@Put(':id')
update(@Param('id') id: string, @Body() updateCatDto: UpdateCatDto) {
return `This action updates a #${id} cat`;
}
@Delete(':id')
remove(@Param('id') id: string) {
return `This action removes a #${id} cat`;
}
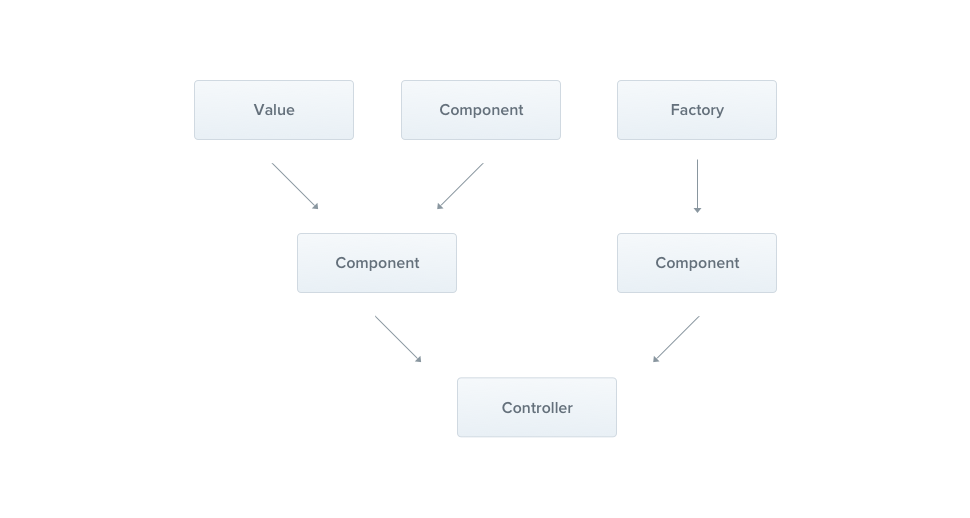
}Providers & DI (의존성 주입)
// app.controller.ts
import { Body, Controller, Get, Param, Req } from '@nestjs/common';
import { Request } from 'express';
import { AppService } from './app.service';
@Controller('cats')
export class AppController {
constructor(private readonly appService: AppService) {}
@Get('hello/:id/:name')
getHello(
@Req() req: Request,
@Body() Body,
@Param() param: { id: string; name: string },
): string {
console.log(req);
console.log(param);
return this.appService.getHello();
}
}- 소비자(Consumer) 입장: AppController
- 제품: appService
// app.module.ts
import { Module } from '@nestjs/common';
import { AppController } from './app.controller';
import { AppService } from './app.service';

@Module({
  imports: [],
  controllers: [AppController],
  providers: [AppService],
})
export class AppModule {}- Module에서 AppService가 공급자(Provider)로 취급되고 있다.
- controller라는 소비자가 공급자로부터 서비스를 주입받아서 사용하는 개념
Modules & 캡슐화
모듈 만들기
$ nest generate <schematic> <name> [options]
$ nest g <schematic> <name> [options]
module 이름은 복수형으로 짓는 것이 컨벤션
e.g) CLI를 이용하여 controller, service, module 만들기
- module: nest g mo cats
- controller: nest g co cats
- service: nest g service cats
캡슐화
exports 해주어야만 provider로부터 해당 service를 주입받아 사용할 수 있다.
@Module({
  controllers: [CatsController],
  providers: [CatsService],
  exports: [CatsService]
})
export class CatsModule {}
Nest Middleware
Express의 미들웨어 개념과 동일하다.

- CLI 활용하여 middleware(logger) 생성: nest g middleware logger
import { MiddlewareConsumer, Module, NestModule } from '@nestjs/common';
import { AppController } from './app.controller';
import { AppService } from './app.service';
import { CatsModule } from './cats/cats.module';
import { LoggerMiddleware } from './logger/logger.middleware';

@Module({
  imports: [CatsModule],
  controllers: [AppController],
  providers: [AppService],
})
export class AppModule implements NestModule {
  configure(consumer: MiddlewareConsumer) {
    consumer.apply(LoggerMiddleware).forRoutes('*');
  }
}
- nest에서 제공하는 logger를 이용할 수도 있다.
@Injectable()
export class LoggerMiddleware implements NestMiddleware {
  private logger = new Logger('HTTP');

  use(req: Request, res: Response, next: NextFunction) {
    this.logger.log(req.ip, req.originalUrl);

    next();
  }
}

res.on('finish', foo): 라우트가 response하는 것까지 log 찍는 방법
Exception filter & Pipes
// NestJS에서 기본으로 제공하는 ERROR 정보
{
  "statusCode": 500,
  "message": "Internal server error"
}💡 에러 정보에 다른 정보를 추가하고 싶다면?
→throw new HttpException('api is broken', 401);

만약 형식도 바꾸고 싶다면,
@Get()
async findAll() {
  try {
    await this.service.findAll()
  } catch (error) {
    throw new HttpException({
      status: HttpStatus.FORBIDDEN,
      error: 'This is a custom message',
    }, HttpStatus.FORBIDDEN, {
      cause: error
    });
  }
}
{
  "status": 403,
  "error": "This is a custom message"
}
더 효율적인 예외 필터링을 위해 필터링을 별도의 파일에 분리시켜 활용할 수 있다.
→ @UseFilters 데코레이터를 활용한다.
- main.ts 에 app.useGlobalFilters(new HttpExceptionFilter()); 를 통해서 예외처리를 전역적으로 해줄 수 있다.
pipes
- 변환: 입력 데이터를 원하는 형식으로 변환
- 유효성 검사: 입력 데이터를 평가하고 유효하면 변경하지 않고 전달한다. 그렇지 않으면 데이터가 올바르지 않을 때 예외를 발생시킨다.
@Get(':id')
  getOneCat(@Param('id', ParseIntPipe) param: number) {
    console.log(param);
    console.log(typeof param); // String -> number

    return 'get one cat api';
  }
위와 같이 파라미터를 받을 때, @Param() 의 인자로 key값을 넣게 되면 곧바로 value를 받게 된다.
이때 pipes를 이용하면, 파라미터를 받을 때 곧바로 형변환이 가능하다. (위의 예제에서는 ParseIntPipe 활용)
뿐만 아니라, 예외 시 Validation failed와 같은 유효성 검사도 자동으로 추가된다.
Interceptors & AOP 패턴
AOP(Aspect-Oriented Programming)
관점 지향 프로그래밍으로, 어떤 로직을 기준으로 핵심적인 관점, 부가적인 관점으로 나눠보고 그 관점을 기준으로 각각 모듈화 하겠다는 의미
- 핵심적인 관점: 개발자가 적용하고자 하는 핵심 비즈니스 로직
- 부가적인 관점: 핵심 로직을 수행하기 위해 필요한 DB연결(JDBC), 로깅, 파일 입출력 등...
Interceptor
미들웨어와 유사하지만 또 다른 여러가지 유용한 기능을 가지고 있다.
- bind extra logic before / after method execution
- transform the result returned from a function
- transform the exception thrown from a function
- extend the basic function behavior
- completely override a function depending on specific conditions (e.g., for caching purposes)
Request Lifecycle
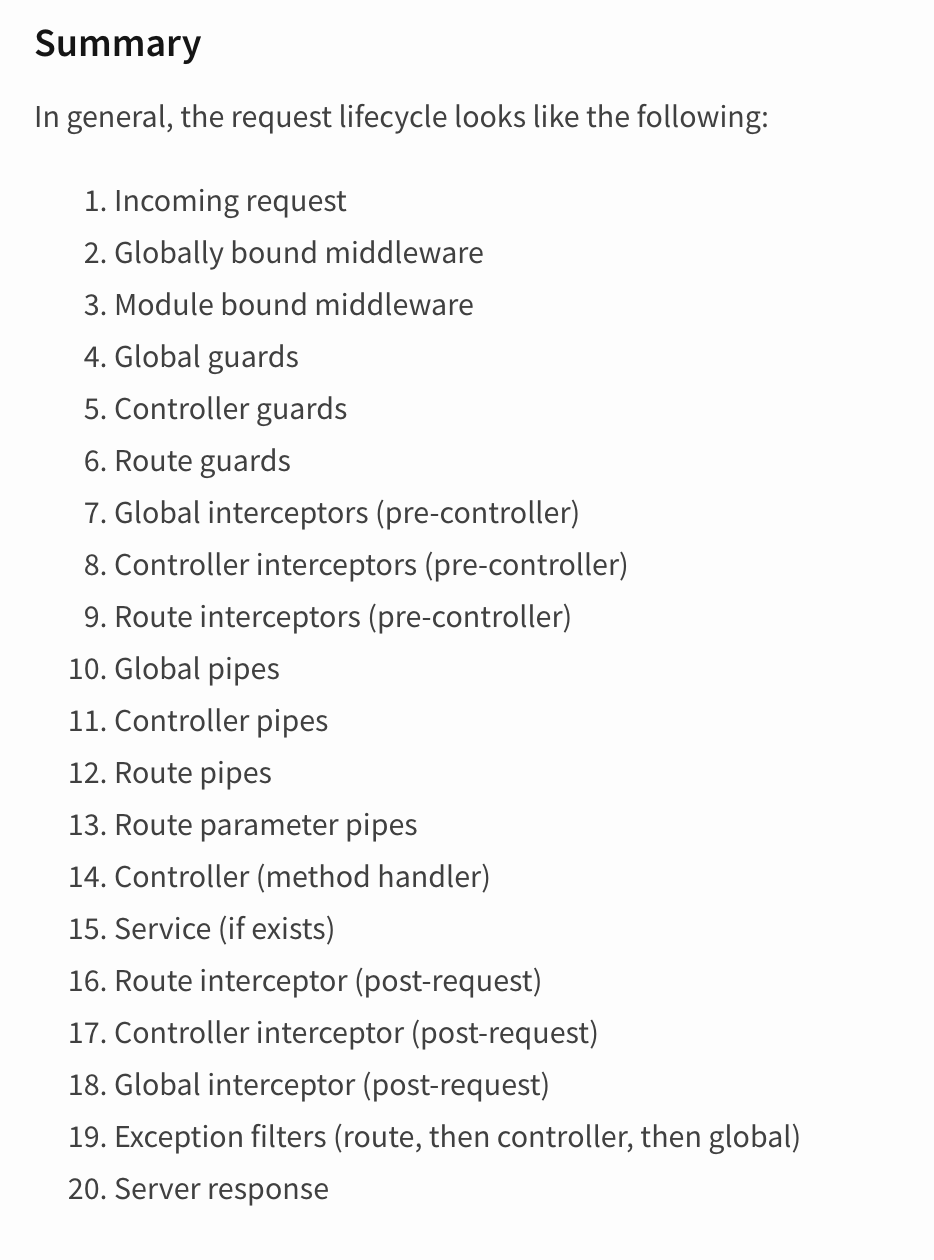
middleware → interceptors 의 순서로 프로세스가 구성된 것을 확인할 수 있다.
// success.interceptor.ts
import {
  Injectable,
  NestInterceptor,
  ExecutionContext,
  CallHandler,
} from '@nestjs/common';
import { Observable } from 'rxjs';
import { tap } from 'rxjs/operators';

@Injectable()
export class SuccessInterceptor implements NestInterceptor {
  intercept(context: ExecutionContext, next: CallHandler): Observable<any> {
    console.log('Before...');

    const now = Date.now();
    return next
      .handle()
      .pipe(tap(() => console.log(`After... ${Date.now() - now}ms`)));
  }
}// cats.controller.ts
@Controller('cats')
@UseInterceptors(SuccessInterceptor)
@UseFilters(HttpExceptionFilter)
export class CatsController {
constructor(private readonly catsService: CatsService) {}
@Get()
getAllCat() {
console.log('hello controller');
// throw new HttpException('api broken', 401);
return 'all cat';
}
// 특정한 고양이 가져오기
@Get(':id')
getOneCat(@Param('id', ParseIntPipe) param: number) {
console.log(param);
console.log(typeof param);
return 'get one cat api';
}
}따라서 위와 같이 인터셉터를 직접 로깅으로 확인해보면, 결과물로 아래와 같이 출력되고, 실행 순서를 확인할 수 있다.

이상 NestJS의 공식문서에 기재되어 있는 Introduction 내용을 공부하였는데, 이전에 만들어두었던 express.js를 사용한 프로젝트 중 하나를 NestJS로 리팩토링(or 미니 마이그레이션?)하며 직접 실습을 해볼 예정이다.
특히 LifeCycle의 기본적인 순서는 꾸준히 보며 익혀놓는게 전체적인 구조를 바라보는데 유용할 것 같다.
공부하며 내내 Spring과 유사한 점이 많다고 느꼈다.